 JetLogix
13 Administration
This chapter is for administrators. Settings is shown in the menu only to users with the role Administrator.
13.1 The System Settings screen
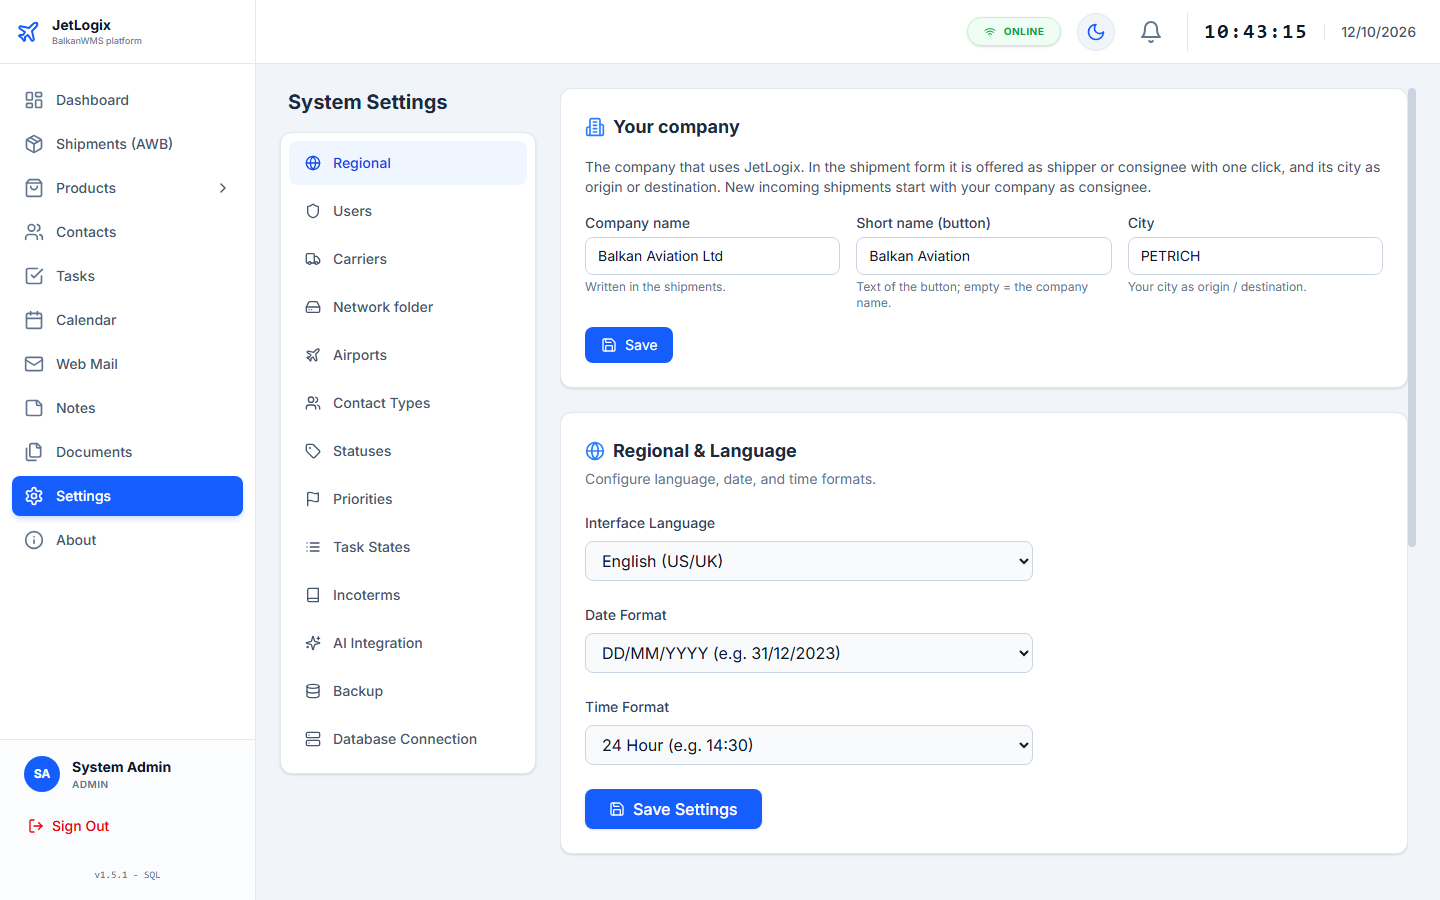
Open Settings in the menu. The tabs on the left open the parts of the configuration:
| Tab | Section | Content |
|---|---|---|
| Regional | 13.2 | Your company, language, date and time format, POD policy, public holidays. |
| Users | 13.3 | User accounts, roles, rights, audit log. |
| Carriers | 13.4 | Carriers: links, tracking source and keys, Geniki vouchers, network folder. |
| Network folder | 13.5 | The office network folder W:. |
| Airports | 13.6 | Airport codes. |
| Contact Types | 13.7 | Types of contacts. |
| Statuses | 13.8 | Shipment statuses. |
| Incoterms | 13.9 | Delivery terms. |
| AI Integration | 13.10 | Google Gemini key and model. |
| Backup | 13.11 | Database backups and restore. |
| Database | 13.12 | Connection to the SQL Server database. |
13.2 Regional settings
13.2.1 Your company
The company that uses JetLogix. Fill it in once, right after the installation.

| Setting | Description |
|---|---|
| Company name | Your company as written in the shipments, for example Balkan Aviation Ltd. |
| Short name (button) | The text of the button that puts your company on the shipper or consignee side, for example Balkan Aviation. Empty = the company name. |
| City | Your city, in capitals, for example PETRICH. Offered with one click as origin or destination. |
Press Save. New incoming shipments then start with your company as consignee and your city as destination.
13.2.2 Regional & Language
| Setting | Options |
|---|---|
| Interface Language | English, Ελληνικά (Greek), Български (Bulgarian). |
| Date Format | DD.MM.YYYY, DD/MM/YYYY, MM/DD/YYYY, YYYY-MM-DD. |
| Time Format | 24 Hour or 12 Hour. |
Press Save Settings. The settings apply to all users.
13.2.3 Proof of delivery (POD)
Tick for which shipments a signed POD is expected: Outgoing shipments (export) (ticked by default) and/or Incoming shipments (import). This decides where POD missing is shown on the Dashboard and for which shipments JetLogix looks for a POD on the network folder. Press Save.
13.2.4 Calendar: public holidays
Tick the countries whose public holidays are shown in the calendar: Greece and/or Bulgaria. Press Save.
13.3 Users
The User Management list shows every user with name, e-mail, role and an Online badge for users active in the last 10 minutes.
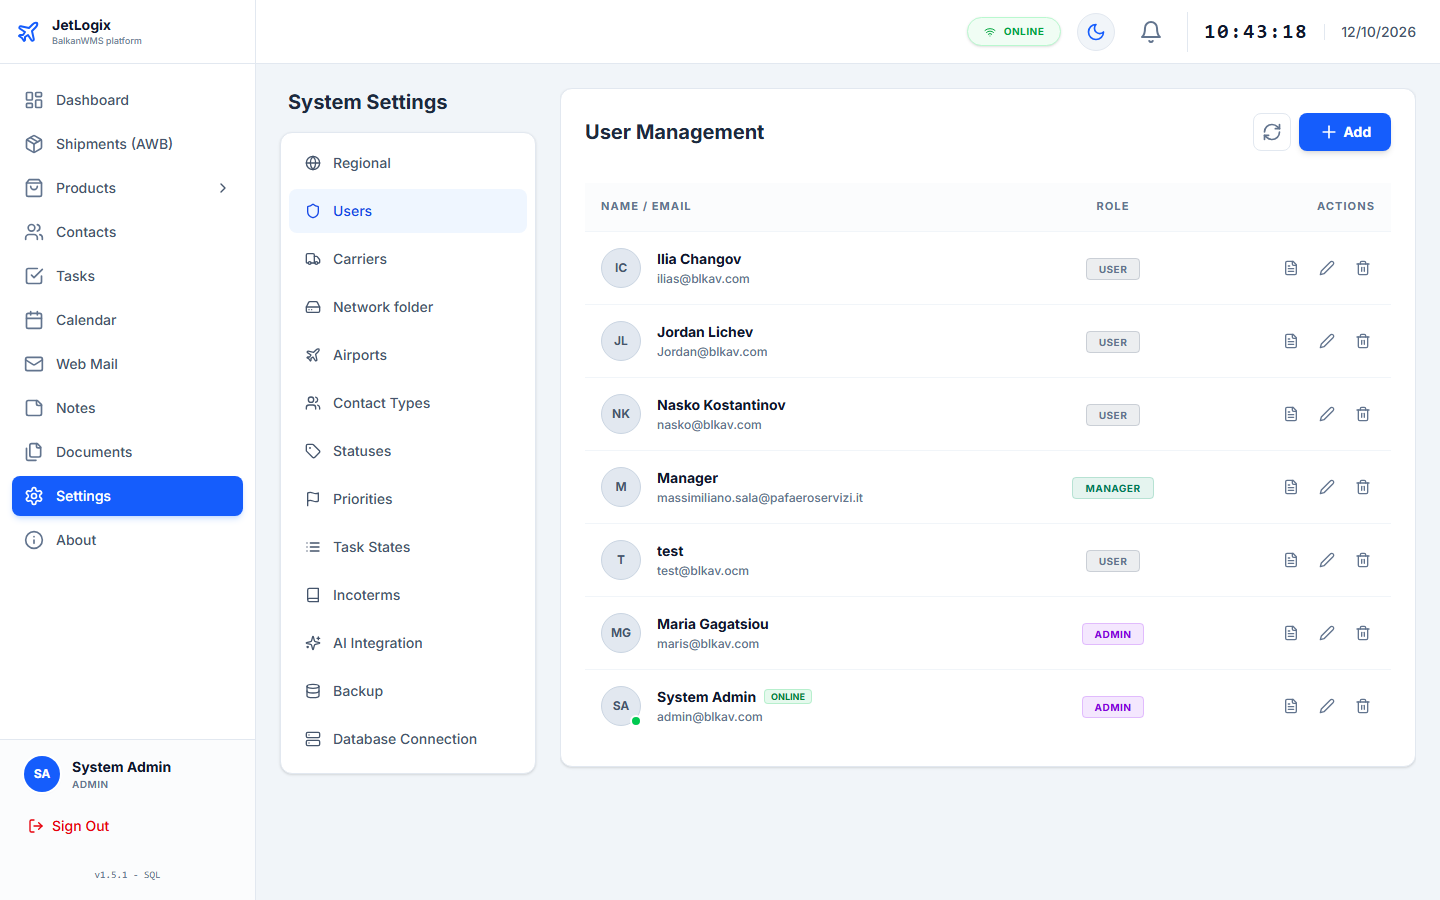
13.3.1 Creating a user
- Press Add.
- On the Profile Info tab fill in Full Name, Username, Email and Password (at least 8 characters). Choose the User Role (Administrator, Manager, Standard User), the Theme (Dark or Light Mode) and the Preferred Language.
- On the User Rights tab tick the screens the user may open.
- Optionally, on the Email Server tab enter the user's mailbox settings and press Test. Users can also set up their mailbox themselves in Web Mail (chapter 10).
- Press Save Configuration.

13.3.2 Changing a password
Open the user with Edit, type the new password in Password and press Save Configuration. Leave the field empty to keep the current password. The user is signed out on all computers and must sign in with the new password.
13.3.3 Rules
- The user name and the e-mail must be unique.
- You cannot delete your own account or remove your own administrator role.
- The last administrator cannot be deleted.
13.3.4 Audit log
Press View Logs next to a user to see the last 200 actions of that user (sign-in, sign-out and changes), with date and time, details and the IP address of the computer. Export the log with CSV or PDF.
13.4 Carriers
Everything about a carrier is kept in one place: its name and links, how its shipments are tracked, its API keys, its vouchers and its folder on the network folder. Carrier Configuration lists the carriers offered in the shipment form; under each name it shows how the carrier is tracked.

Press Add for a new carrier, or click a carrier to open it. The carrier window has these tabs:
| Tab | Content |
|---|---|
| General | Name, logo and the link to the carrier's own tracking page. |
| Tracking | Where the tracking comes from, the API account and a test. |
| Vouchers | Only for Geniki Taxydromiki: how vouchers are made. |
| Network folder | The carrier's folder for copies of vouchers and PODs. |
Press Save once at the end: the carrier, its keys and its folder are saved together. Cancel closes the window without changing anything.
13.4.1 General
| Field | Description |
|---|---|
| Name | The carrier's name as it appears in the shipments, for example DHL Express. |
| Logo URL | Address of the carrier's logo (shown in the lists). |
| Tracking page (link) | The carrier's own tracking page, opened with Carrier page. Write {trackingNumber} where the AWB number goes, for example https://tracking.example.com/track?num={trackingNumber}. |
13.4.2 Tracking

Tracking source decides how the shipments of this carrier are tracked:
| Source | Meaning |
|---|---|
| Automatic (from the carrier name) | JetLogix chooses from the name: DHL, FedEx/TNT, UPS, Geniki, Econt and Speedy are asked directly, all others through 17TRACK. |
| DHL API, FedEx API, UPS API, Geniki Taxydromiki API, Econt, Speedy API | Always this direct connection, whatever the name. |
| 17TRACK | Always through 17TRACK. |
| Manual (carrier page only) | No automatic tracking: follow the shipment on the carrier's page. Use it for carriers that no tracking service knows, so that no 17TRACK quota is spent. |
Now tracked by shows the result. When the keys of a direct connection are missing, 17TRACK is used meanwhile.
Direct connections
For DHL, FedEx/TNT, UPS, Geniki, Econt and Speedy the tab shows the account of that connection:
| Connection | What to enter | Where to get it |
|---|---|---|
| DHL | API key | developer.dhl.com > My Apps > "Shipment Tracking - Unified". |
| FedEx / TNT | API key (Client ID), Secret key | developer.fedex.com > My Projects > project with the Track API. |
| UPS | Client ID, Client Secret | developer.ups.com > Apps > Tracking API. |
| Geniki Taxydromiki | User name, Password, Application key | From Geniki Taxydromiki (web service). The same account makes the vouchers. |
| Econt | e-Econt user name and password (optional) | Works without keys. |
| Speedy | API user name, Password | With your Speedy contract (ask Speedy for API access). |
An account can serve several carriers: for example the FedEx account tracks both FedEx and TNT. The tab then shows Shared account: also used by ..., and a change applies to all of them.
Saved keys are stored encrypted on the server and are shown only as A value is saved; leave a field empty to keep the saved value. Remove keys deletes them. Every account shows how many checks were made today against the daily limit.
Carrier API account (carriers without a direct connection)
For every other carrier the tab shows Carrier API account, with exactly the fields that the carrier's own API asks for. Fill it in when the carrier gives you API access: the account is kept encrypted and is ready for a direct connection in a next version of JetLogix. Until then the carrier is tracked through 17TRACK (or by hand).
| Carrier | Fields | State |
|---|---|---|
| Sameday | Country, Environment, API user name, API password | Direct connection planned. |
| ACS Courier | API key, Company ID, Company password, User ID, User password, Billing code | Direct connection planned. |
| DSV | Environment, myDSV user name and password, Tracking and Access Token subscription keys | Through 17TRACK. |
| BOX NOW | API address, Client ID, Client secret, Partner ID | Through 17TRACK (the BOX NOW API shows only the parcels you send yourself). |
| GLS | API key, API secret | Through 17TRACK. |
| ELTA Courier | Customer code, Sub-code, User name, Password | Through 17TRACK. |
| Geis, Unimasters, Interlogistica | Customer number, Contact for the status, Notes | No API known: choose Manual as tracking source. |
| Any other carrier | API address, user name, password, API key and secret, customer number, notes | Through 17TRACK. |
The window shows, for each carrier, what its API does, how to get the keys and a link to its documentation. The list on top of the account lets you choose another API type when the name does not match.
17TRACK
17TRACK tracks all carriers without their own connection. Its account (API key and the maximum of new numbers per month) is shared by all carriers and is set at the bottom of the Carrier Configuration page, in Tracking for all other carriers (17TRACK). Only the free quota is used: when it is reached, new numbers are not registered and nothing is charged.
In the carrier window, Carrier in 17TRACK chooses the carrier code in 17TRACK when the automatic choice from the name is not right.
Testing a tracking number
At the bottom of the Tracking tab, type a real number of this carrier and press Test. The answer of the carrier is shown; nothing is stored. Save the keys before testing.
13.4.3 Vouchers (Geniki Taxydromiki)
| Setting | Description |
|---|---|
| Environment | Production for real vouchers, or Test (Geniki's test server) for trying out. |
| Voucher label | A4 sheet (normal printer), Sticker (label printer) or Sticker F6. |
| Extra services | The extra services offered in the voucher window (one per line: code = name). |
In the test environment, Run Geniki test runs Geniki's certification steps and offers the Voucher PDF and the Test report for download.
13.4.4 Network folder of a carrier
Copies of the carrier's vouchers and PODs are saved in its folder on the network folder, in the folder of the year, for example W:\AWB - Geniki - BG\2026\5190000001 - Egnatia - GIN2339 - Geniki.pdf.
| Field | Description |
|---|---|
| Save copies for this carrier | Switches the copies on or off. |
| Folder | The folder inside the network folder, for example AWB - Geniki - BG. Empty = no copies. |
| End of file names | The carrier's short name at the end of the file names, for example Geniki. |
| Also for carrier names | Other spellings of the carrier name that use the same folder, for example Geniki, Γενική. |
Press Check the folder to see whether the server can write there. Existing files are never overwritten.
13.5 Network folder
JetLogix reads the office network folder (W: on the office computers) to suggest and link documents, and writes copies of vouchers and PODs into the carrier folders.
| Setting | Description |
|---|---|
| Folder on the server | The folder as seen by the server. Leave empty to switch the feature off. |
| Name shown to users | Usually W:. |
| Windows path (for information) | The path as seen by the office computers. |
Press Save, then Test to read the whole folder (this can take up to a minute).
The folders for the copies of vouchers and PODs are set per carrier (section 13.4, Network folder of a carrier); this page lists them with the result of the last Test.
13.6 Airports
The list of airport codes, for example ATH or SOF. Press Add to add a code; use the buttons of a row to edit or delete it.
13.7 Contact Types
The types offered in the Contact Type field of the contact form, for example Customer, Supplier, Agent.
13.8 Statuses
The shipment statuses offered in the shipment form and the status filters (section 4.2).
13.9 Incoterms
The delivery terms offered in the shipment form, each with its code (for example EXW, DAP) and description.
13.10 AI Integration
JetLogix uses the Google Gemini service for AI Ops Analysis on the Dashboard, AI Smart Scan of business cards and Auto-Fill of MSDS / TDS sheets.
- Gemini API key: the key of the company's Google AI account. It is stored on the server and never shown again; enter a new key to replace it.
- Gemini model: the model to use. Leave the default unless advised otherwise.
13.11 Backup
MS SQL Database Administration creates and restores backups of the JetLogix database.
- Trigger Full Backup creates a full SQL Server backup of the database, stored in the backup folder of the SQL Server.
- Refresh Backup List lists the existing backups. Download (.bak) saves a backup on your computer.
- Restore brings the database back to the state of a backup.
13.12 Database
SQL Database Server Connection Settings holds the connection to the SQL Server database: Host / IP Address, Port, DB Username, DB Password and Database Name. Save & Connect tests the connection before saving it.
13.13 Licence
JetLogix works with a licence key issued by Balkan for your installation. The licence sets:
- Users at the same time - how many users may be signed in at the same time;
- Modules - which menus are available (Dashboard, Shipments (AWB), Contacts, Tasks, Calendar, Web Mail, Notes, Documents, Products, MSDS / TDS, Brochures, Aircraft). Settings and About are always available. A menu that is not in the licence does not appear for anybody, administrators included;
- Valid until - the last day of the licence, or Never expires.
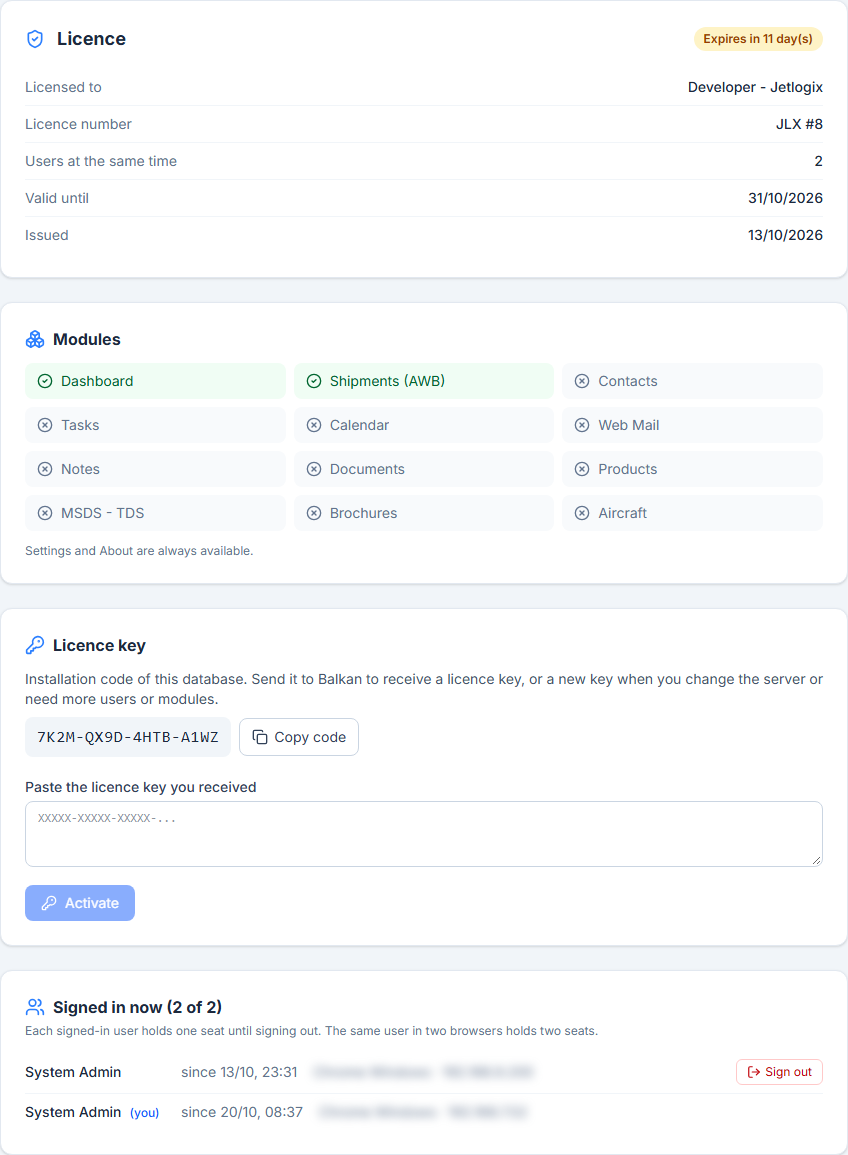
Settings › Licence shows the state of the licence (Valid, Expires in N day(s), Expired - view only or No valid licence), the customer it was issued to, the licence number, the users, the expiry date and the modules.
13.13.1 Entering the licence key
- Open Settings › Licence. Under Licence key you see the installation code of this database (four groups of four characters, for example
7K2M-QX9D-4HTB-A1WZ). - Press Copy code and send the code to Balkan.
- You receive the licence key: a long text of groups of five characters.
- Paste it into Paste the licence key you received and press Activate.
The key is checked at once. When it is accepted you see The licence key was accepted. and the new licence applies to everybody immediately. A key that is not accepted leaves the old one in place; the message says why (for example This licence key was issued for another database or another SQL Server.).
13.13.2 Without a valid licence
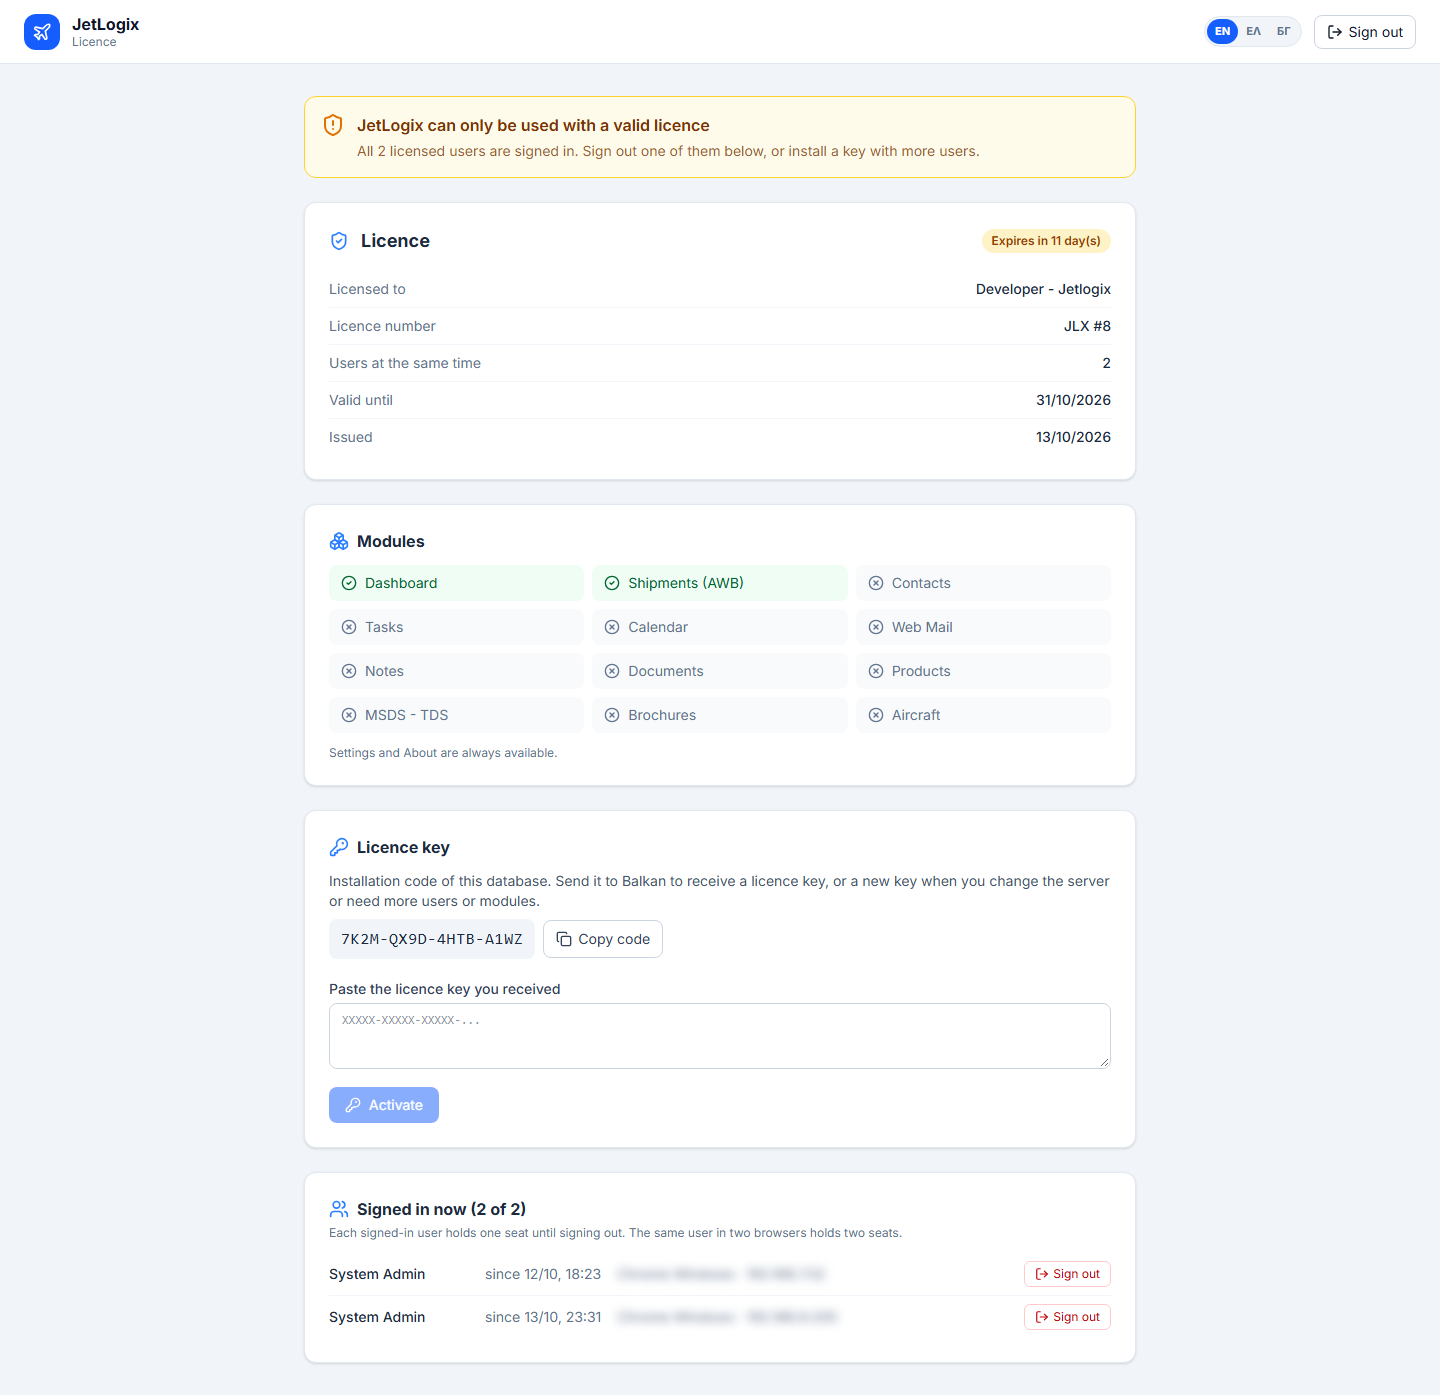
When there is no key yet, or the key is not valid for this database, only administrators can sign in, and only to the Licence screen. The other users see JetLogix has no valid licence. Please ask your administrator.
13.13.3 Users signed in now
Signed in now (N of M) lists the users who hold a place: name, since when, browser and address. Each signed-in user holds one place until signing out; the same user in two browsers holds two places.
- Sign out next to a user signs that user out and frees the place. Work the user has not saved yet is lost, so ask first when you can.
- When all places are taken, an administrator can still sign in, to the Licence screen only, to free a place. As soon as a place is free, the administrator takes it and JetLogix opens normally.

13.13.4 Expiry
- From 30 days before the expiry date, administrators see an amber bar: The licence expires in N day(s).
- After the expiry date, JetLogix works in view-only mode: everybody can sign in and see the data, but nothing can be saved, and the automatic tracking updates stop. A red bar shows The licence expired on ...: view only. A new key from Balkan makes JetLogix fully usable again at once.
