 JetLogix
4 Shipments (AWB)
The Shipments (AWB) screen is the heart of JetLogix. Every incoming (import) and outgoing (export) shipment is recorded here with its air waybill (AWB) or courier number, its parties, pieces and weight, its documents and its tracking.
4.1 The shipment list
Open Shipments (AWB) in the menu. The Shipment Management screen lists all shipments.

4.1.1 Searching and filtering
| Control | Use |
|---|---|
| Search AWB, Shipper, Consignee... | Type part of an AWB number, a company name, a carrier, an origin or a destination. The list is filtered while you type. |
| All / In / Out | Show all shipments, only incoming or only outgoing ones. |
| All Statuses | Show only one status, or Active Operations (all shipments still on their way). |
Click the column titles AWB & Carrier, Status or Route to sort the list.
4.1.2 What the columns show
| Column | Content |
|---|---|
| AWB & Carrier | The AWB number and the carrier. Voucher pending means an outgoing Geniki shipment whose voucher has not been created yet. |
| Status | The status of the shipment, the colleague it is assigned to and the latest tracking event reported by the carrier. For a partial delivery, (x/y) shows how many pieces have arrived. |
| Route | Origin ✈ destination, with the consignee (outgoing) or the shipper (incoming). |
| Details | The ETA (in red, Delayed, when the date has passed), the number of pieces and the weight. |
| Actions | Buttons for the signed POD, the label, the documents (paper clip with the number of files), the carrier's tracking page, edit and delete. |
4.1.3 Right-click menu
Right-click a shipment to open its menu:
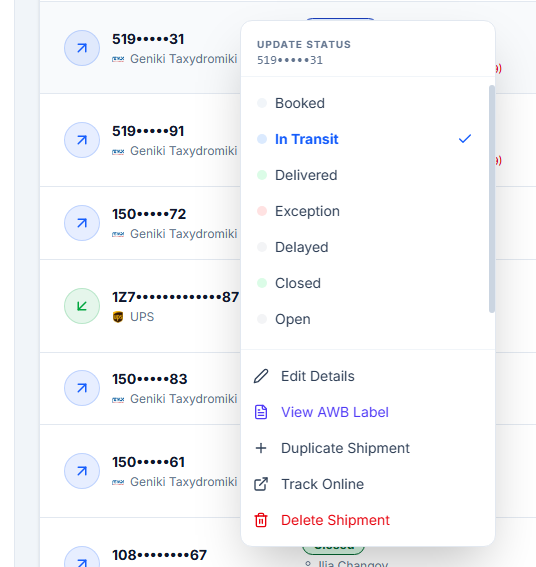
| Entry | What it does |
|---|---|
| Update Status | Changes the status directly, without opening the shipment. Choosing Closed also fills in today as the delivery date. |
| Edit Details | Opens the shipment. |
| View POD (Signed) / View AWB Label | Opens the POD or the label, when attached. |
| Duplicate Shipment | Creates a copy with the AWB <AWB>-COPY and the status Booked. Open the copy and correct the AWB and the other details. |
| Track Online | Opens the carrier's tracking page for this AWB. |
| Delete Shipment | Deletes the shipment after a confirmation. |
4.2 Shipment statuses
Every shipment has a status. The usual path of a shipment is:
Booked → In Transit → Arrived → Delivered → Closed
with Customs Hold or Exception when there is a problem on the way, and Partially Delivered when only some of the pieces have arrived.
| Status | Meaning |
|---|---|
| Booked | The shipment is registered; the goods have not left yet. |
| In Transit | The goods are on their way. |
| Arrived | The goods have arrived at the destination airport or depot. |
| Customs Hold | The goods are held by customs. |
| Exception | The carrier reports a problem (delay, damage, wrong address...). |
| Partially Delivered | Some of the pieces are delivered, the rest are still on their way. |
| Delivered | All pieces are delivered. The shipment waits to be checked and closed. |
| Closed | The shipment is finished: POD attached, pieces, weight and delivery date checked. |
You do not have to change the status by hand while the shipment travels: carrier tracking changes it automatically (In Transit, Customs Hold, Exception, Delivered) and fills in the real delivery date. Closing the shipment is always done by a person (section 4.8).
4.3 Creating a new shipment
- In Shipments (AWB), press New Shipment.
- Choose the Direction: Incoming (Import) or Outgoing (Export).
- Choose the Carrier. Its logo is shown next to the list.
- Type the AWB number, for example
123-45678901. - Fill in the shipper and the consignee (section 4.4), the route and the pieces.
- Press Save Shipment.
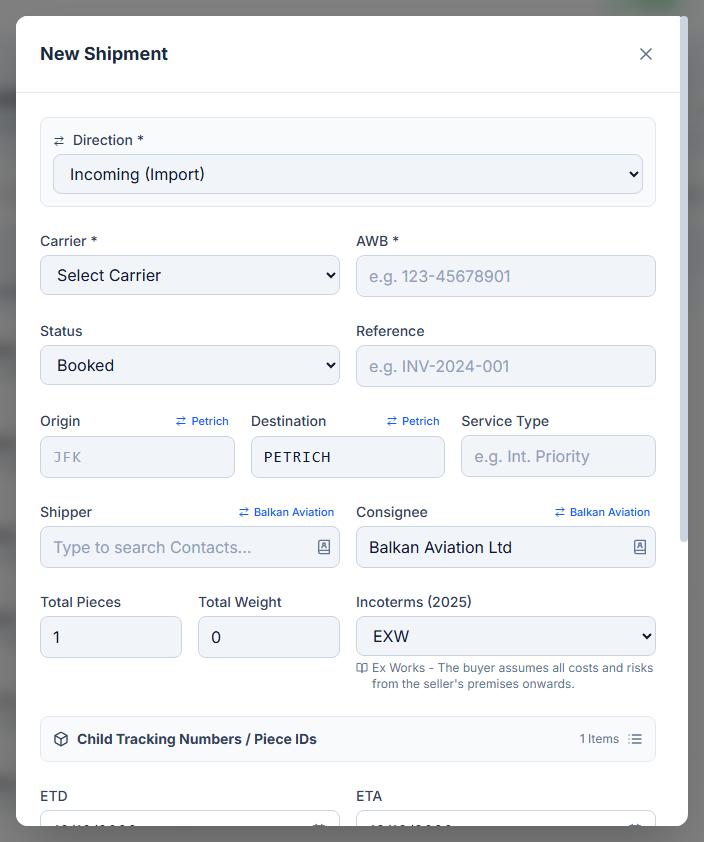
Right after saving, JetLogix asks the carrier for the tracking of the new shipment.
4.3.1 Fields of the shipment
| Field | Required | Description |
|---|---|---|
| Direction | Yes | Incoming (Import) or Outgoing (Export). |
| Carrier | Yes | The carrier, from the list kept by the administrator (section 13.4). |
| AWB | Yes | The air waybill or courier number. For an outgoing Geniki shipment it may stay empty: the number is then given by the Geniki voucher (chapter 5). |
| Status | The status (section 4.2). | |
| Reference | Your reference, for example an invoice or order number. A GIN number in it is reused in the file names of Geniki vouchers. | |
| Origin / Destination | City or airport, written in capitals. The button with your city (Petrich in the pictures) fills it in. | |
| Service Type | The carrier's service, for example Int. Priority. | |
| Shipper / Consignee | The sending and the receiving company (section 4.4). | |
| Total Pieces / Total Weight | Number of pieces and weight in kg (decimal comma or point). | |
| Incoterms (2025) | The delivery term. Its description is shown under the list. | |
| ETD / ETA | Estimated date of departure and of arrival. | |
| Assign to User | The colleague responsible for the shipment. | |
| Notes | Free text. |
If the AWB is missing, JetLogix shows Please fill in required fields (AWB).
4.4 Shipper and consignee
The Shipper and Consignee fields search the customer book of Contacts (chapter 7) while you type.
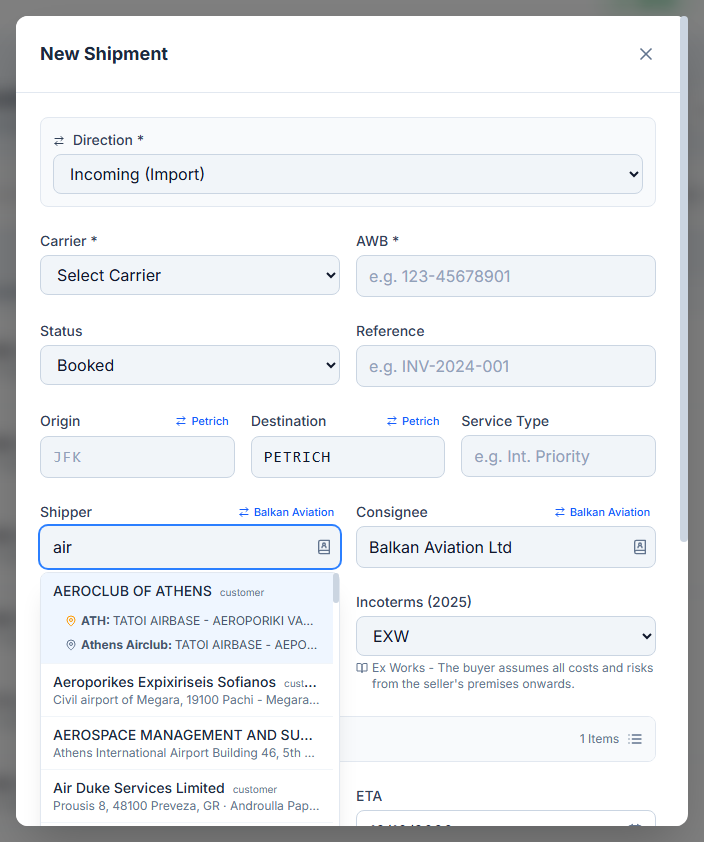
- Start typing a company name, a city, a person or a telephone number.
- Choose the contact from the list. Contacts that match the direction of the shipment are shown first: customers for outgoing shipments, suppliers for incoming ones.
- If the contact has several delivery addresses, choose the address from the list that appears.
The name is filled in as Company - Person, and an empty origin or destination takes the city of the address.
- Press the book icon to browse the whole customer book.
- Press X (Unlink from the customer book) to remove the link to the contact but keep the text.
- You may also type any name freely. When the company is not found, JetLogix keeps what you typed and reminds you that you can add it to the customer book by marking the contact as Customer or Supplier in Contacts.
The button with your company name next to each party (Balkan Aviation in the pictures) fills in your company on that side and moves the other party to the opposite side.
4.5 Pieces and piece IDs
When a shipment has more than one piece, the section Child Tracking Numbers / Piece IDs opens. Enter the tracking number of every box, for example for FedEx multi-piece shipments or for shipments that arrive in several parts.
4.5.1 Partial deliveries
When only some of the pieces arrive, set the status to Partially Delivered. The section Partial Delivery Tracking appears:
- Tick the pieces that have arrived. JetLogix shows Delivered: x / y.
- Delivered Pieces (Auto) and Delivered Weight (Approx) are calculated from the ticked pieces.
- Press Save Shipment.
The list then shows Partially Delivered (x/y); point at it to see which pieces have arrived.
4.6 Tracking
Saved shipments show the Tracking panel with the information received from the carrier.
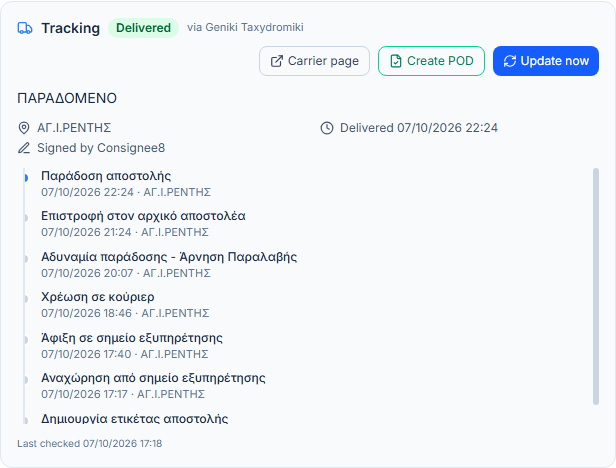
The panel shows the current tracking status, the location, the expected or actual delivery date, the name of the person who signed for the goods, the full list of events and the time of the last check.
| Button | What it does |
|---|---|
| Update now | Asks the carrier for the latest status of this shipment. |
| Carrier page | Opens the carrier's own tracking page. |
| Create POD | Appears when the carrier reports the shipment as delivered: creates a proof of delivery PDF (section 4.7). |
4.6.1 Updating the tracking of all shipments
In the shipment list, press Update tracking to ask the carriers about all open shipments at once (up to 25 per press; shipments checked in the last 10 minutes are skipped). A summary shows how many shipments were checked and how many changed status. If more are waiting, press the button again.
4.6.2 Carriers that cannot be tracked automatically
Tracking works directly with DHL, FedEx / TNT, UPS, Geniki Taxydromiki, Econt and Speedy. All other carriers are tracked through 17TRACK, within its free monthly quota. When a shipment cannot be tracked, the panel shows Manual tracking with the reason: track it on the carrier's page with Carrier page.
4.7 Documents and POD
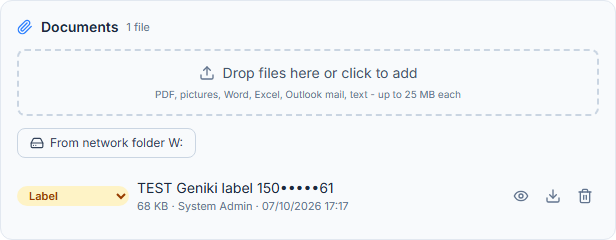
Every saved shipment has a Documents panel with its waybill, POD, label, certificates, customs papers and any other file.
4.7.1 Adding files
- Drag files onto Drop files here or click to add, or click the area to choose them.
- Accepted: PDF, pictures, Word, Excel, Outlook mail (
.msg,.eml), text and CSV, up to 25 MB each. - JetLogix recognises the kind of document from the file name (Waybill (AWB), POD, Label, Certificate, Customs, Other). Correct it in the list next to the file if needed.
- For shipments with several pieces, choose the package a document belongs to, or All packages.
Every file shows who added it and when. Use the buttons to view it in the application, download it or delete it.
4.7.2 Files on the network folder W:
JetLogix looks on the office network folder W:\ for files whose name contains the AWB number:
- Found on W: for <AWB>: lists the files found, PODs first. Press Link to attach one file, or Link all (N) to attach them all.
- POD found on W:: when a POD is expected but not yet attached and one is found on
W:, a green box offers Link POD. - Press From network folder W: to browse the network folder yourself (section 6.3).
Files on W: are linked, not copied: they stay on the network folder. Removing such a file from the shipment does not delete it from W:.
4.7.3 Creating the POD from tracking
When the carrier reports the shipment as delivered but you have no signed POD, press Create POD in the Tracking panel. JetLogix creates a PROOF OF DELIVERY PDF with the carrier's logo, the shipment details, every tracking event and the name of the person who received the goods, with date and time. The PDF is attached as a POD (and, for Geniki, copied to the network folder).
4.8 Closing a delivered shipment
When a shipment is Delivered, the form shows an amber box with what is left to do:

- Add the signed POD under Documents (or Link POD, or Create POD). If it is still missing the box says No POD yet.
- Check the received pieces, the weight and the delivery date.
- Press Close shipment. The status becomes Closed and the real delivery date is filled in from the carrier's tracking, or with today.
When you set the status Closed by hand, the Real Delivery Date is required and cannot be in the future.
4.9 Comments and mentions
Saved shipments have a Comments panel, where colleagues can discuss the shipment.
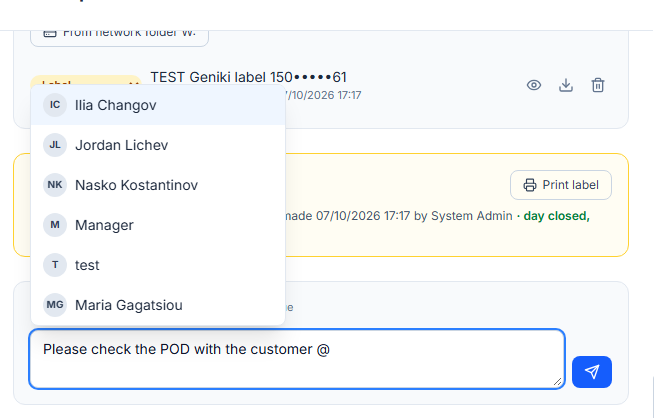
- Type your comment in Write a comment....
- To notify a colleague, type
@and choose the name from the list (arrow keys, thenEnterorTab). - Press the send button or
Ctrl+Enter.
The colleagues you mention and the colleague the shipment is assigned to receive a notification (section 2.4). Comments that mention you are highlighted. You can edit or delete your own comments; edited comments are marked edited.
4.10 Exporting the list
Press Export in the shipment list:
- Export to CSV saves the shipments shown (AWB, carrier, status, shipper, consignee, origin, destination, pieces, weight, ETD, ETA) as a file that opens in Excel.
- Export to PDF creates a printable Shipment Report in landscape format.
The export contains the shipments that match the current search and filters.